
Inkling How-To Series Part 3: Adding and Cropping Images

This is part three of our Inkling How-To blog series, where readers can learn tips and tricks on how to get the most out of the Inkling platform. Stay tuned for a new post every month!
Inkling Habitat is the built-in content authoring tool that makes it beautifully simple to create and edit mobile-ready interactive training and reference content. Users can drag and drop pre-built content widgets to embed videos, audio clips, interactive timelines, annotated images, and even self-assessments to help aid employee comprehension and retention of important information.
How To Use Images to Improve Content
Pictures are worth a thousand words. Using images in your training, operating manuals, or general company content is a great way to express an idea and better explain a concept to the reader. This is especially true for visual learners, who need images to help them comprehend the training they need to do their job. For employees with visual and cognitive disabilities, Inkling allows you to add alternative text for the image as well.
In addition to information retention, cropping images and utilizing aspect ratios helps maintain a uniform look and feel for your content. You do not need to have a design background to make your content look great! For example, applying an aspect ratio on an image can help you create a banner image for your page. You can also use aspect ratios to ensure images in a table stay aligned and similar sizes.
Add an Image
1. Drag an image pattern from the Add Pattern sidebar to your page.
2. You will see the Edit Image window, which provides two ways to include an image. You can choose a new image from your desktop or select a stored image from the media library. Select Click to Upload Image.
3. Choose an image and click Open.
4. Confirm that the preview shows the image that you want to add.
Crop the image (optional)
Cropping an image helps you choose which part of the image to display within your page and can help maintain a cleaner design for the page.
5. The Crop button appears after you add a new image or choose a stored image.
Note the following:
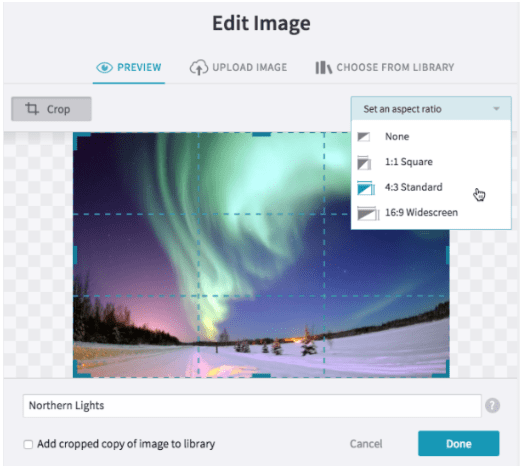
To perform a freehand crop, specify None and adjust the image borders to crop the image. To resize the cropped area, select a corner or side and drag.
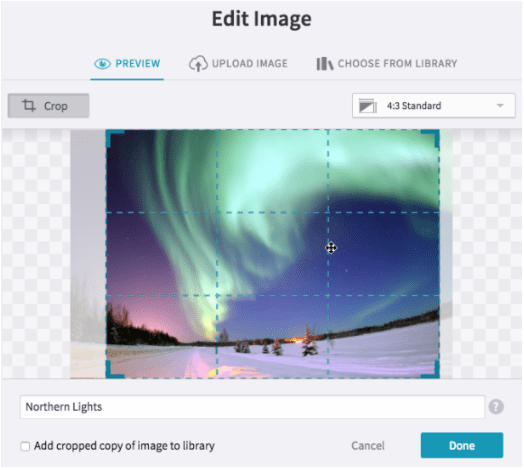
- To specify an aspect ratio use the dropdown menu. The aspect ratio helps you maintain a proportional relationship between the height and width of the image.
- To move the cropped area, the cursor changes to a move icon to show you can reposition the cropped area.
- To save the cropped image to your library, Habitat saves the original image in the media library. You can click “Add cropped copy of image to library” to also store the cropped image version for use elsewhere in your project.
![]()
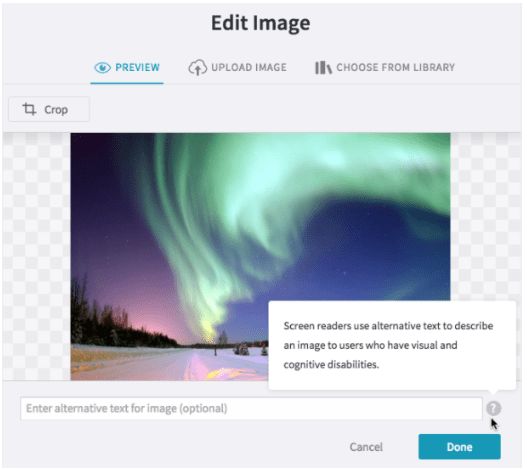
6. Add alternative text (optional)
Alternative text help users with visual and cognitive disabilities understand web content. It conveys essential information about an image.
To add alternative text for the image, type into the textbox at the bottom of the preview screen.
We hope you found this tutorial helpful. Visit the Inkling Customer Community on LinkedIn to chat with other Inkling customers about their best practices!
About the Author